Showing posts with label DIY. Show all posts

Tuesday, July 24, 2012

DIY: Simple Hook Magnets


This project came about when I kept on looking for the key container, and not only that I kept on complaining that the key container are taking over the dining table. So to save some table space, and to get organized, I had these questions and criteria inside my head? 
  •  Where can I put these keys so that I would be able to find it?
  •  Keep people inside the house to know where to put them back. 
  • Doesn't take table space.
  • Organized.
  • Must be D.I.Y.
  • Cheaper than having to buy myself a wall key holder.
  • Won't create holes on the wall.
The solution I got was simple enough, I frequently use the fridge to hang my utility bill papers, so why not create something that made use of that space. It is also visible so, I now know where to find keys, and where to put them back.

So let's start our DIY!

 Materials: 
  • Rectangular Magnetic Sheet
  • heavy duty double sided tape (omit if the wall hooks you bought came with a sticky strip/tape)
  • Wall hook (with a flat backing)
  • scissors or blade cutter
  • cutting mat
  • Ruler (preferably metal ruler if you'll use it with a cutter.

STEP 1 
You need to make sure that you have a fridge or a metal wall to hang this little DIY. 
Let's start. Measure the width (a) and the height (b) of the Flat backed Hook. Take note of the size.

STEP 2 
Use the measurement a x b as a reference when cutting your little rectangle magnets. Cut the magnetic sheet.


STEP 3
If you have:

A. Flat backed hooks with sticky tape/strip;
All you have to do with this kind of hook is you take the other side of the stick strip and glue it to the magnetic sheet. Then you're done.

B. Flat backed hooks without sticky tapes;
This is where you have to use the heavy duty double sided tape, cut a strip enough to glue the hook to the magnetic sheet. Stick the double sided tape to the hook first, then pull the other side of the tape, next glue your magnetic sheet to it. 


Side view of the finished magnetic hook

Then your done. 

You can also use these hook for hanging small kitchen towels. 


Monday, July 16, 2012

DIY refillable CD/DVD Book: to keep those Cd & DVD organized


It's DIY time again!

This CD/DVD book came about when I had to organize all my loose file CD. My CD filer was full, so I thought of buying a new one, that was refillable & it wasn't available in the local store, or they were too expensive to buy. 

So my idea bulb went flickering & thought of creating one for myself, with some materials that are just hanging around the house + buying what's available at the mall.

Materials:
1. Old paper, stored in your house with prints. (magazine paper, old kraft paper, stored gift wrap paper, etc.) 
These paper were all used & stored, and now will be reused again for this project.

Kraft paper's former life: Packaging for a T-shirt
Fiber paper's former life: Packaging for bouquet of flowers
Gift wrapping paper's former life: Gift wrapper 

2. Board such as Cardboard, Illustration Board, or  an Old corrugated box.
In this project I used the Corrugated board as the cover for the CD/DVD Book
3. Loose CD/ DVD sleeves
4. Post & screws to hold the book together.

5. Cutter and scissors
6. Hole Puncher
7. Cutting Matt
8. Glue or a Glue stick


Instructions:

1. To start the project, you will need 4 rectangle boards for the cover.

2. Cut 2 rectangles measuring 1.5 cm by 14 cm on  a corrugated board (you can also use illustration board or a thick cardboard) We will call this as the Board A. There's a printable template available at the bottom of the page.

3.  And then cut another 2 rectangles measuring 13 cm by 14 cm on  a corrugated board (you can also use illustration board or a thick cardboard) We will call this as the Board B.


4. After cutting the boards, you will have to cut 2 wrapping paper with the size of 7 3/4 x 7 1/2 inches. This paper will be used to cover the corrugated board.


5. Prepare your Glue stick/ Glue. Apply glue on one side of the board, then stick it to the wrapping/special paper.


6. If you're using liquid glue, spread liquid glue on the board and spread the liquid glue thinly all around the board, to keep the special paper from having wrinkles.


7. Once the board is glued to the paper it should look like this.


8. Next, Apply glue on the exposed part of the special paper.


9. Fold the corners pointing to the center of the board.


10. Followed by the flaps, which then will be glued on the board.


 11. (Optional) Cut a 4.5 x 5 inches sticker paper to create a clean finish to the cover.


12. This will serve as the covers of the Cd book.


 13. Punch holes on cover, Board A. Insert the post to front cover, put the loose CD/DVD sleeves on the post, then the back cover. Then you're done.


Enjoy!!!

Board and Wrapper Template 


Monday, July 2, 2012

DIY & Reuse: Easy Shelf Pen, Tools containers


I just received a whole new space for my Art materials as well as my ever increasing bead collection, to top it all up I also have several office stuff to organize. 

So, given the circumstance that my conscience won't let me spend a lot of money for nice, new and mass produced containers, I had to think of ways to create a container that won't cost me too much, which was also simple in design. 

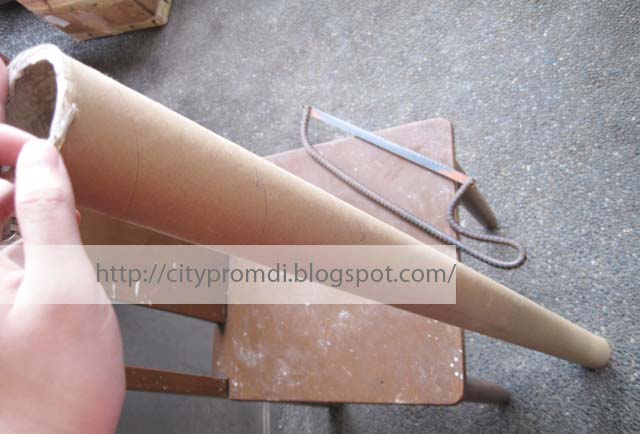
I chanced upon  a paper tube (its former life was to hold several meters of celluloid wrapper) at one of the local bookstores selling school and office supply & made me think. This is my perfect container!  The local store didn't have a price for it, so they sold it to me for 12 cents or Php5.  

materials: paper tube, metal saw, ruler/tape measure (not shown), pencil or pen.


How to: 1. Choose how deep you would like your container to be, I decided on the length of 5 inches for my shelf. 2.  Measure 5 inches from the tip of the tube & mark it with a line, to know where you're going to cut your first tube. 


3. Using the metal saw, cut the tube to the desired length. (my metal saw was borrowed and you can completely see that it was just made from a construction metal pipe, which they use for building a house)


4. My long tube produced around 10 small ones.


5. After cutting, just put them in the shelf, don't forget to put heavy stoppers on both ends of the smalls tubes so it won't run off. What you can also do is glue them to each other but I like them better unglued so I can easily move them and reuse them as thread/yarn/cord/chain holders. Finally. Put all your pens, pencils, cutter, scissors, bead tubes, etc. on your shelf containers, then you're done. ENJOY!